Recently, we just said Goodbye to a Video Editing Software we have been using to edit our video tutorials and other official (and personal) videos. In this post, we are going to introduce you to Filmora, a new addition to our Video Editing Toolbox.
Before proceeding with the Filmora Review, below is why we actually switched from our old video editing software to Filmora.
A Good Video is pretty much like Delicious Food. It can be tasted, but not explained. Similarly Video Editing is like Cooking! A Recipe has no soul. You as the Cook, Must bring soul to the recipe. When it comes to making a Great Video, it doesn’t really matter what kind of camera you used to shoot the video or how many “Pixels” there are in your HD. The only thing that matters is, “How You Put the Things Together & What Does Your End Product Look Like”.
Introduction of Filmora in Just One Sentence
Filmora is a Video Editing Software that helps you create a video that Doesn’t Suck!
Filmora Review
Filmora is a product of Wondershare, a Shenzhen (China) based company that was founded in the year 2003. A wide variety of PC and Mac based software and a user base of more than 50 Million makes Wondershare a popular (and reliable) name in the world of software development industry. You can see the most popular software products from Wondershare by Clicking Here, for now, let get back to Filmora Review.
Filmora is the upgraded version of “Wondershare Video Editor”. It is a user-friendly and an all-in-one Video Editing Software to personalize videos with rich music, text and a lot of other cool effects. Let us go inside and see the actual Filmora user-interface.
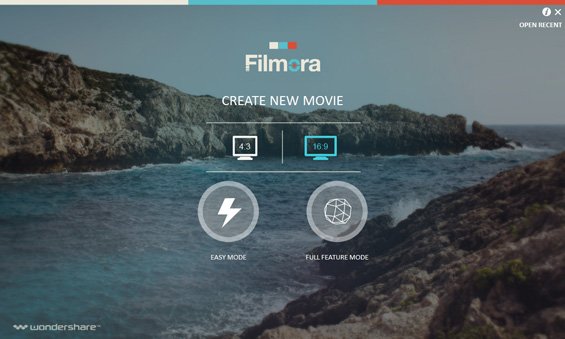
Filmora – The Opening Screen
Click Here to See The Bigger Image
When you start Filmora, the first thing you see on the opening screen is a couple of choices. Before proceeding with your Video Editing Project, the first thing you need to do is to choose the dimension you want your video to be in.
Available Options
- 4:3 standard screen
- 16:9 Wide Screen
If you are like most users (that we hope you are), you will choose the wide screen option. 16:9 or wide screen is the dimension that most of the modern devices e.g. Android, iPhones and a Digital single-lens Reflex Camera (DSLR) record in.
The 2nd thing that you will do on the opening screen is to select a mode that you want to load to edit your video.
Available Options
- Easy Mode
- Full Feature Mode
Filmora – The Easy Mode
The first option or Easy Mode is something that helps you edit your videos faster. All you need is to follow 3 simple steps (shown below) to get your amazing video ready to share with the world.
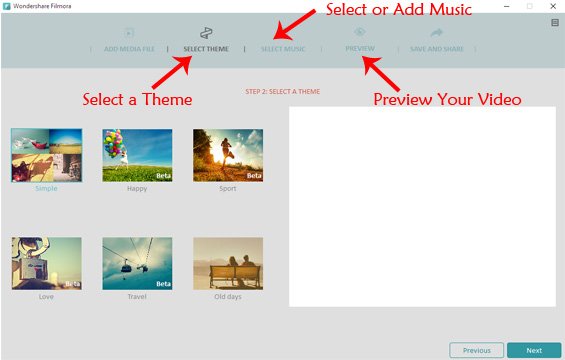
Click Here to See The Bigger Image
- Choose a ready to use theme
- Select Music (from available options) or add background music of your choice
- Preview your video to make sure, the end product looks exactly what you wanted it to be.
That’s it!
Save your video in your desired format and share it with whoever you want and however you want. There’s a built-in option in Filmora that lets you upload your videos directly from Filmora to popular video sharing sites e.g. YouTube, Facebook and Vimeo.
Filmora – The Full Feature Mode
The Full Feature mode of Filmora consists of 3 different sections;
- Main Navigation
- Timeline
- Video Playback
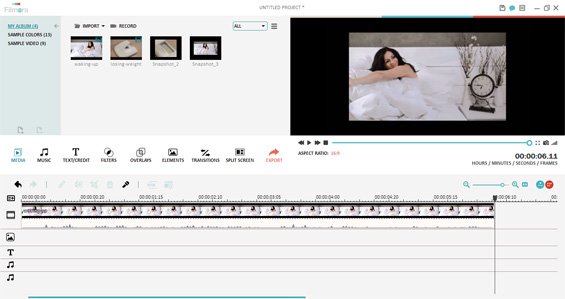
Click Here to See The Bigger Image
As the name suggests, Main Navigation is the section that carries all of the major menu items. All of the components of the Main Navigation are self-explanatory. For example, Media (the first menu item) is the place where you import all of your media files for your video editing project. All of the media files can be organized here the way you want.
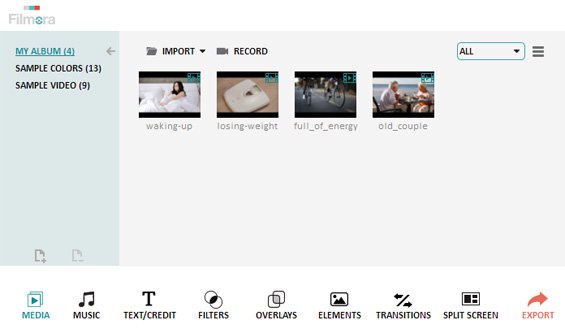
The other menu items in this section include Music, Text, Filters, Overlays, Elements, Transitions, Split Screen and Export.
Filmora – The Timeline Section
Timeline is the 2nd of total 3 sections of the Filmora Full Feature mode. You can drag and drop all of your media files in this section for basic adjustments. The timeline section allows you to trim and split your media files, so that you can add or delete things to and from your videos. You can also combine multiple videos in this section. Moreover there is also an option to record your own voice as a commentary over your videos by using a microphone.
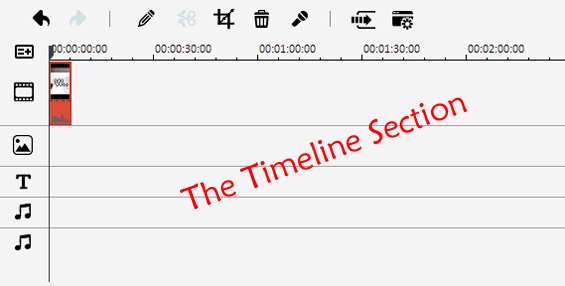
There are some other very useful tools in this section e.g. Video Cropping, Masking faces or blurring specific parts of the video. But instead of discussing this sort of options in this basic Filmora Review, soon we’ll publish a series of Video Tutorials to help you better understand these features.
Filmora – The Video Playback Section
The Video Playback section is the last component of the Filmora Full Feature mode. This section is primarily used to review the changes you make to your Videos.
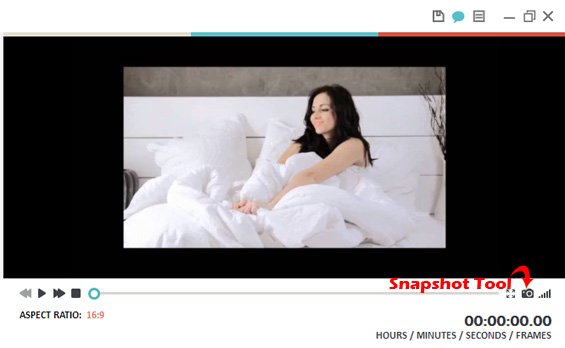
There is another useful tool (Snapshot) beneath the video preview screen. By using the Snapshot tool you can capture any moment inside your video and save it as an image file with just a single click of your mouse.
Coming Up Next – Filmora Video Tutorials
In our Filmora Video Tutorials, we’ll show you how to use the video editing tools inside the Full Feature mode. You will also learn our secret techniques to make ordinary videos look great! Until then Download Filmora for free by visiting the official website and start playing with the software for some basic understanding. Don’t forget to subscribe to our mailing list and you’ll be notified as soon as we publish our Video Editing Tutorials.
Leave A Comment